2.- CURSORS, MOUSE AND
ICONS
Now that we
have a walking character we need a visual interface for the mouse or we wont
be able to know what we are doing once in the game.
Before we do the actual configurations you will need to create the icons you are going to use and this depends on the look you want your game to have, for example These basic icons for take/use, look and walk, all with an ACTIVE and INACTIVE state so whenever there is something to look at youll see the eyes open icon etc.
I created these for a personal project of a cartoony adventure.
![]()
Once you
have your icons you are ready to insert them into your game. Go to the CURSORS
section ![]() and create the ones you are going to need; in
this tutorial I created one for the WALK cursor, another for the TAKE cursor
and the other for the LOOK cursor. (Remember
its done trough this
and create the ones you are going to need; in
this tutorial I created one for the WALK cursor, another for the TAKE cursor
and the other for the LOOK cursor. (Remember
its done trough this ![]() icon)
icon)
You will
import the images depending on the state, select the Active Cursor Tab and
import the active cursor image (or
animation sequence), then select the Inactive Cursor Tab and import the
inactive cursor image.
Repeat for
the Walk icon and any other mouse icons youll need
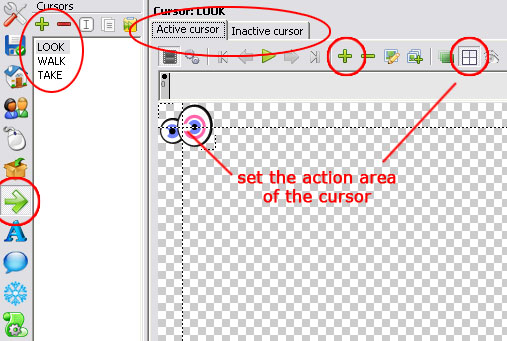
You now
need to establish the action area of each cursor trough the icon ![]() (It means its the click point of your mouse.)
(It means its the click point of your mouse.)
In my LOOK
cursors I want them to be on the center so visually the cursor activates when
the eyes are inside a clickable object (see the cross in the center of the
eyes?)
If you
leave this cross point at default you might not notice when you are on a
clickable object in the game since your icon might be on the spot but the
cursors cross hasnt touched the action area or is too far away, so always
check the cross position to be on a suitable area of the cursors image.
Now that we
established the cursors graphics we are going to create the actual mouse
interfaces
Select the
INTERFACES Tab ![]() and create
and create ![]() an interface and rename it
an interface and rename it ![]() MOUSE.
MOUSE.
Under the Buttons Tab create ![]() three buttons and rename
three buttons and rename ![]() them, for this tutorial I named them LOOK,
TAKE, WALK but you can use the words you like.
them, for this tutorial I named them LOOK,
TAKE, WALK but you can use the words you like.
IMPORTANT,
since these are going to be CURSORS we need to specify their TYPE as COMMAND BUTTON to all of them.

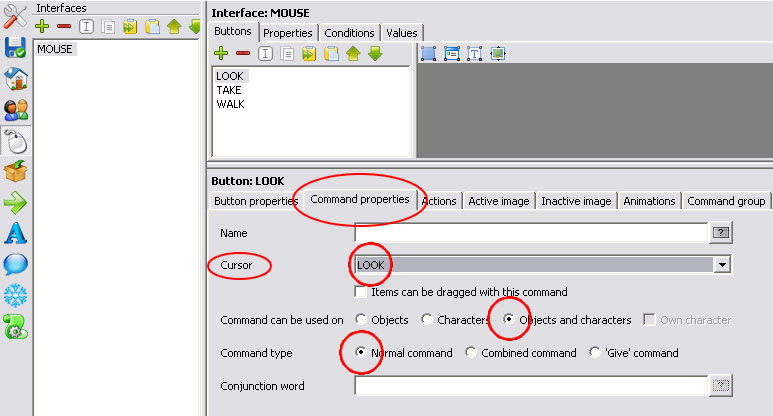
Now we need
to specify the properties of the cursors, for this open the COMMAND
PROPERTIES of each button and configure them like this.
In the
CURSOR tab select the corresponding cursor graphic (These where created in the
cursors ![]() panel)
panel)
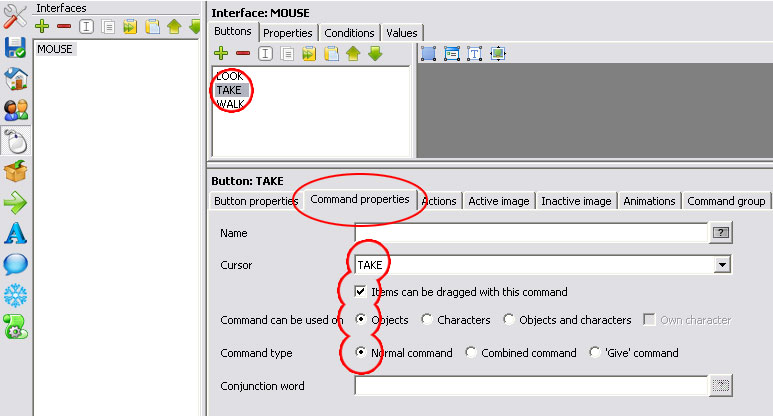
Bellow the
cursor tab there is an option of Items can be dragged with this command, use
this option for the TAKE or USE cursors, this means you can move items in your
inventory with those specific cursors, but its not needed for commands like
LOOK or TALK.
Also, you
can specify where certain cursors can be used on, The LOOK command can be used
on both characters and objects, but a command of TALK can or should be only
used on Characters, and the TAKE should only be used on objects.
The command
type should be left as NORMAL COMMAND for most cursors.
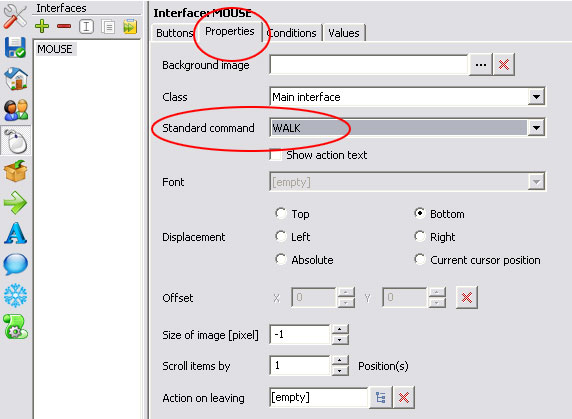
You can
establish a standard command by going to the properties tab and select the
cursor you want to set as default, for this tutorial I selected the WALK
cursor. (But you can create a standard pointer cursor
and command and select it in this tab instead of a WALK cursor)
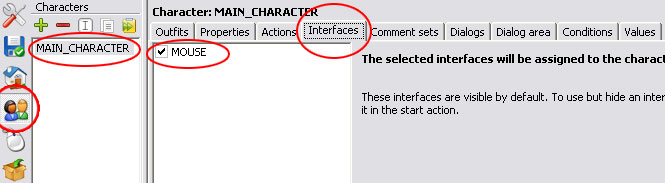
Now that we
have a MOUSE interface we need to add it to the character, so go into the
Characters tab ![]() , select your MAIN_CHARACTER and go to the INTERFACES tab, you will see the MOUSE
interface with a blanc box, this means the interface is working and is active
but you wont be able to use it on this character unless you select it here. So
check the MOUSE as this characters mouse interface.
, select your MAIN_CHARACTER and go to the INTERFACES tab, you will see the MOUSE
interface with a blanc box, this means the interface is working and is active
but you wont be able to use it on this character unless you select it here. So
check the MOUSE as this characters mouse interface.
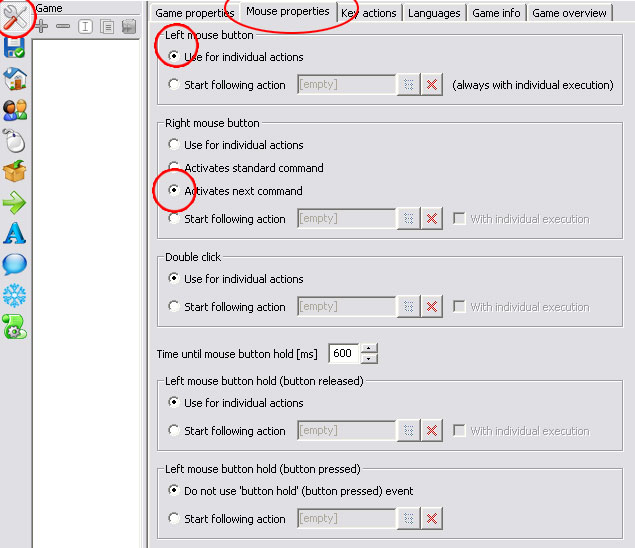
Finally
lets open the GAME ![]() tab and open the MOUSE PROPERTIES, the LEFT mouse button should be used only for
INDIVIDUAL ACTIONS, but the RIGHT mouse button can be used in different ways,
for this tutorial I want it to work similar to the way Sam&Max Hit
the road game does, so when you use the right mouse button the cursors
cycle. For setting this up select under the RIGHT mouse button the option
ACTIVATES NEXT COMMAND
tab and open the MOUSE PROPERTIES, the LEFT mouse button should be used only for
INDIVIDUAL ACTIONS, but the RIGHT mouse button can be used in different ways,
for this tutorial I want it to work similar to the way Sam&Max Hit
the road game does, so when you use the right mouse button the cursors
cycle. For setting this up select under the RIGHT mouse button the option
ACTIVATES NEXT COMMAND
Once
finished we go create a FONT