1.- Starting for the first time
What we are going to do is
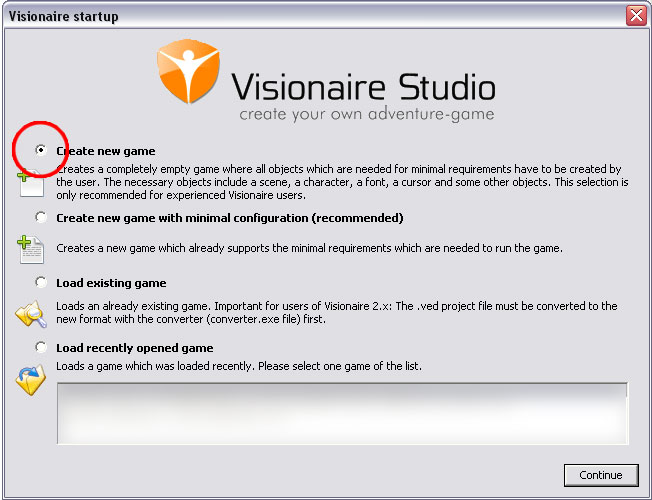
create a new game, in the startup screen there are several choices but if you
are going to start a new game. I strongly
recommend you choose the first
option; Dont be scared by the description saying is only recommended for experienced users, I will be showing you how
to build games from scratch and you will
see how easy it is to build things from the ground up..
2.- Creating your main character
The first thing we should
do is create a character with at least the standing and walking stances.
For the actual animation you can either draw each frame or animate it in 3D and
render it (its up to YOU).
If you go the traditional way take in consideration you will need to animate at
least three angles (front, left and back (![]() the right angle can be a duplicate of the left
angle but mirrored in the characters propertiesmore on this later)).
the right angle can be a duplicate of the left
angle but mirrored in the characters propertiesmore on this later)).
Im going to assume you
have the character animation done already, I found it better to use PNG images
as they are higher quality than .GIFs
So, lets go
to the characters tab ![]() and lets create a character by pushing on the
and lets create a character by pushing on the ![]() button, and rename it with the
button, and rename it with the ![]() button, for this tutorial I named it MAIN_CHARACTER
(you can name your character whatever youd like)
button, for this tutorial I named it MAIN_CHARACTER
(you can name your character whatever youd like)
When you
select the MAIN_CHARACTER it will
open the settings page for that character and you will see the panel called OUTFITS ![]() with default settings under the name
with default settings under the name ![]() Unbenannt in it (dont know if this name is going to change
in the future).
Unbenannt in it (dont know if this name is going to change
in the future).
![]() Outfits
are the actual shapes that will make the character, the cool thing about
outfits is that you can create several changes that will work as cloth changes
for each character and switch them at any point during your game. With this you
can create a character that can get older during the game, changes clothes
(like space suits, clown disguise, etc.) or even mutates into monsters. That is
up to you and your game.
Outfits
are the actual shapes that will make the character, the cool thing about
outfits is that you can create several changes that will work as cloth changes
for each character and switch them at any point during your game. With this you
can create a character that can get older during the game, changes clothes
(like space suits, clown disguise, etc.) or even mutates into monsters. That is
up to you and your game.
I renamed
the default outfit ![]() to Main_outfit, its always a good practice to be clean and
descriptive while you create your settings, later on you will find this quite
useful and can give you nightmares if you go with default names.
to Main_outfit, its always a good practice to be clean and
descriptive while you create your settings, later on you will find this quite
useful and can give you nightmares if you go with default names.
We should
have something like this
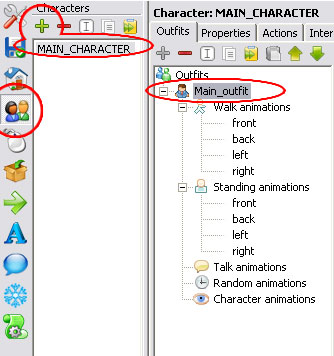
Now look
closely to the tree of your Main Characters outfit, you will see predefined
folders for the basic animations of your character, at default you have
actions for the front, back, left and right but you can add more stances to the
folders (with ![]() ) if you
have animated four more angles like front-left, front-right, back-left,
back-right. (more on this later)
) if you
have animated four more angles like front-left, front-right, back-left,
back-right. (more on this later)
For this
tutorial we are going to use the WALK Animations ![]() and Standing animations
and Standing animations ![]() folders, you can add the animations for
speech, take/use, etc using this same procedure on the rest of the folders.
(NOTE: the Talk animations
folders, you can add the animations for
speech, take/use, etc using this same procedure on the rest of the folders.
(NOTE: the Talk animations ![]() folder is where the animations of the character
talking are going to be placed, the RANDOM animations
folder is where the animations of the character
talking are going to be placed, the RANDOM animations ![]() folder are animations that occur when the
character is idle (similar to screensavers that activate when the computer is
not being used for a long time) and the Character Animations
folder are animations that occur when the
character is idle (similar to screensavers that activate when the computer is
not being used for a long time) and the Character Animations ![]() folder is where every special animations (like
take, push, etc.) are going to be created for later use.
folder is where every special animations (like
take, push, etc.) are going to be created for later use.
Lets start
by creating the STANDING poses (or animations), usually only ONE frame is needed
for the standing poses, but if you want the character to feel more alive you
can add animated standing poses of several frames, but for now we are going to
use only one frame.
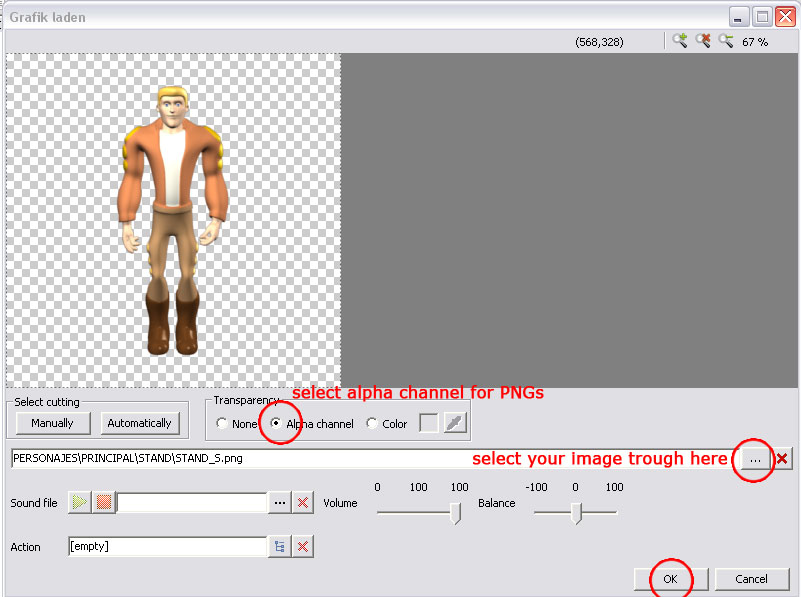
To add an
image, go to the icon ![]() and select your image, in this case I need
only ONE so I used the button
and select your image, in this case I need
only ONE so I used the button ![]() , if I
wanted to add an animation I should have selected the Sequence icon
, if I
wanted to add an animation I should have selected the Sequence icon ![]() instead.
instead.
And you
should have something like this
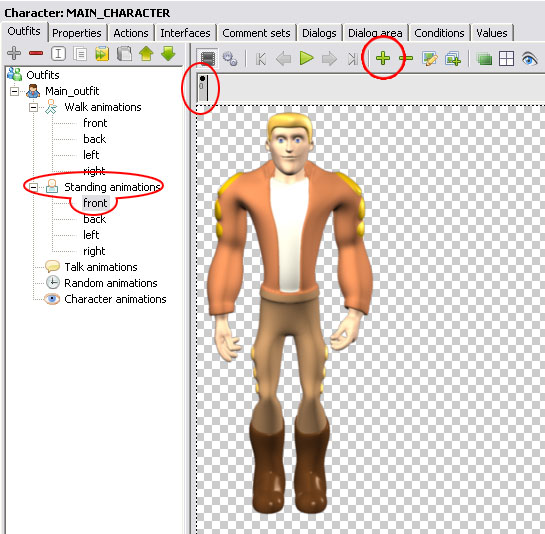
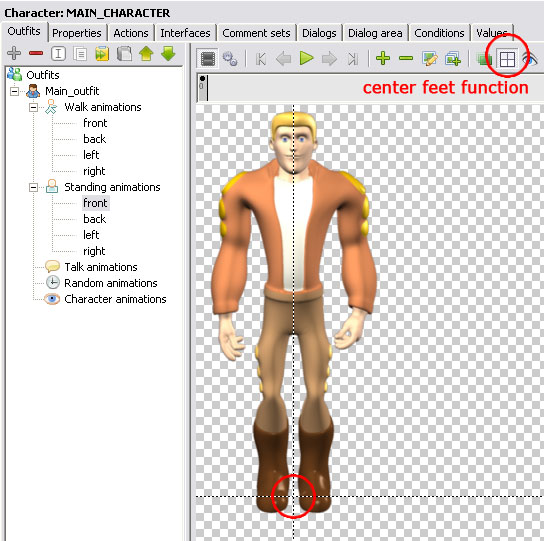
Now is
important to establish the center of the feet ![]() , the
center of the feet should be placed on a neutral zone on each angle
(left-right-front-back, etc.) and represents a virtual axis where the
animations are going to be displayed when the character turns directions.
, the
center of the feet should be placed on a neutral zone on each angle
(left-right-front-back, etc.) and represents a virtual axis where the
animations are going to be displayed when the character turns directions.
SAVING RESOURCES
Depending
on the Character (NOT all characters work with this) we can save some time and
resources by MIRRORING a similar pose or animation, for example the character
animations or poses for the LEFT and RIGHT stances can be mirrored to the other
side (that means the right stance can be a mirror of the left stance and vice
versa)
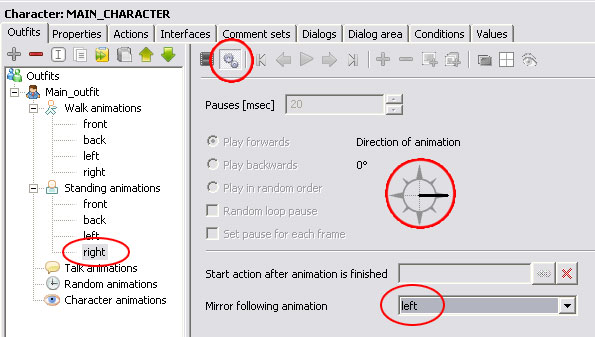
For this to
work we are going to establish the LEFT stance first (same steps described for
the front)
And for the
RIGHT stance we are going to go into its PROPERTIES ![]() and in the Mirror Following Animation tab we
are going to choose the LEFT stance. Note that every option is now grayed out,
it means what ever you change in the LEFT stance its
going to affect the RIGHT stance
and in the Mirror Following Animation tab we
are going to choose the LEFT stance. Note that every option is now grayed out,
it means what ever you change in the LEFT stance its
going to affect the RIGHT stance
CREATING MORE ANGLES
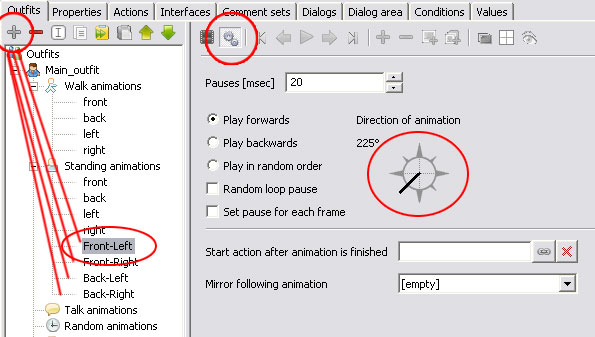
Sometimes
its nicer to have Eight (8) angles for a richer feel of the characters, to do
so just add ![]() new stances and rename them
new stances and rename them ![]() something like Front-Left, Front-Right, Back-Left and
Back-Right.
something like Front-Left, Front-Right, Back-Left and
Back-Right.
(NOTE: you
can name them What Ever you like since it doesnt follow naming conventions, you
can named them like a compass (North, South, East, West) or even the letter (N,
S, E, W) or even in any language (Izquierda, Derecha, Atrs, Adelante))
The really
important configuration is trough the Direction of Animation Compass, so for a FRONT-LEFT stance
the compass should be placed DOWN-LEFT sounds odd? Well imagine the compass
being looked from the Characters perspective and not from the players and you will understand how this works.
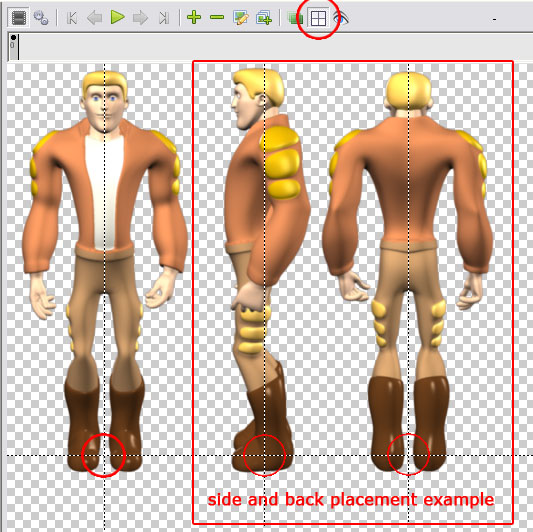
Now
configure the same settings on the rest with their proper compass direction.
The final
look for the character in a FRONT-LEFT position should be something similar
to this (note I also added the center of the feet), Now
go finish the rest of the STANDING Animations

WALKING ANIMATIONS
Walking,
Talking, and ALL the character settings are done in quite the same way as the
STANDING configurations, but there are a couple of extra things to check when
it comes to ANIMATED stances.
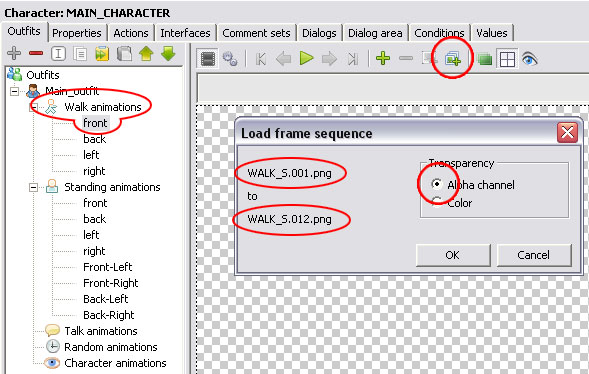
The first
thing is you should add sequences and not single frames, to add image sequences
use the button ![]() and select the first image of the sequence, so
you will get a window like this one. For a standard Walk Cycle 12 frames are quite enough for a nice smooth animation.
and select the first image of the sequence, so
you will get a window like this one. For a standard Walk Cycle 12 frames are quite enough for a nice smooth animation.
After the
sequence is loaded you should place the center of the feet and do an animation check by pressing the PLAY ![]() button.
button.
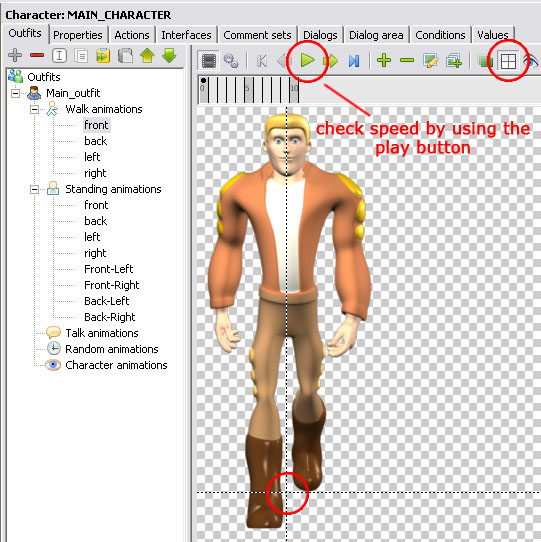
You should
notice the animation plays REALLY fast and that is due to the number of frames,
SO we change the characters speed in the PROPERTIES ![]() and change the PAUSES timing (a higher number the slower the animation plays), For
this character I used a number of 60 (milliseconds), but this number is
different for each character, once established the animation speed it should be
maintained in the rest of the animated angles (left, right, etc.)
and change the PAUSES timing (a higher number the slower the animation plays), For
this character I used a number of 60 (milliseconds), but this number is
different for each character, once established the animation speed it should be
maintained in the rest of the animated angles (left, right, etc.)

These are
the basic principles you will use for every stance for the characters, be it
for walk, speak, stand, take, use, etc, they all go
into the same method of configuration.
You should be
ready to properly configure the rest of the animations.
NOTE, NPC
characters DO NOT need all these stances, its usually
enough to have only one stand, a random animation, and the talk stance for a
single angle unless the character
moves of position.
Im not
going to talk about the rest of the tabs in the characters screen at this
moment.