10.- DIALOGUES
Dialogues
are the Basic foundation of adventure games because the basic idea of adventure
games is telling stories.
There are
two ways for creating dialogues, the simple way using the talk to command, and the
more advanced dialogue that is question/answer driven which takes a bit more
time to create.
In this
tutorial I will show you both methods, and for that I created an NPC character
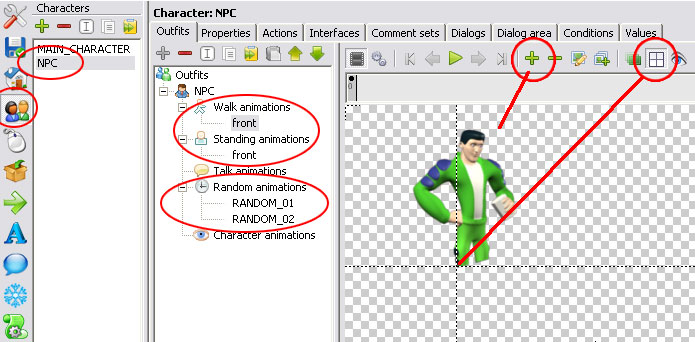
Go to the CHARACTERs panel ![]() and add
a new character and name it NPC. Since
this is going to be only an NPC and it WONT move around I just used ONE frame
for the WALK and STANDING Animations. (I added the
standing frame to the walk animations since I had problems with the NPC not
showing the random animations, so add at least a frame to the WALK animation if
you are using other animations)
and add
a new character and name it NPC. Since
this is going to be only an NPC and it WONT move around I just used ONE frame
for the WALK and STANDING Animations. (I added the
standing frame to the walk animations since I had problems with the NPC not
showing the random animations, so add at least a frame to the WALK animation if
you are using other animations)
The
standing animations can be animated to give a better feel of the scene and not
having stiff characters everywhere.
I created a
couple of RANDOM animations so the character plays them at random since its
going to be idle, the first animation is a drinking sequence, and the second
animation is a looking both ways sequence.
Place the
animation center in a place you know how to access
later on, for this character I placed it on the lower part of his leg (you have to place the center on the
Stand, Walk and both random animations to be in the same spot or the animation
will jump in the screen when reproduced)
Also you
need to make sure all Animation directions to point in the same direction, if
one is pointing on a different direction it wont show up.
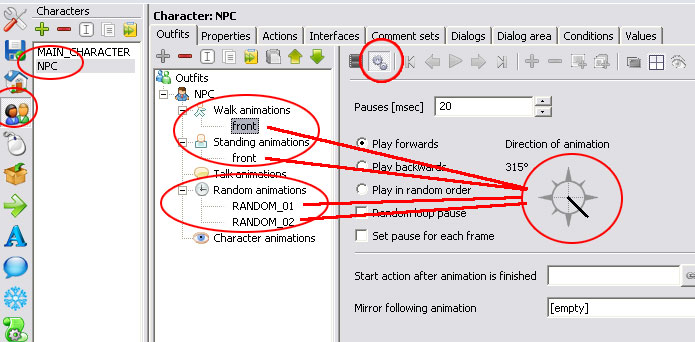
You can add
the TALK ANIMATION (but since I havent created it yet I wont use it)
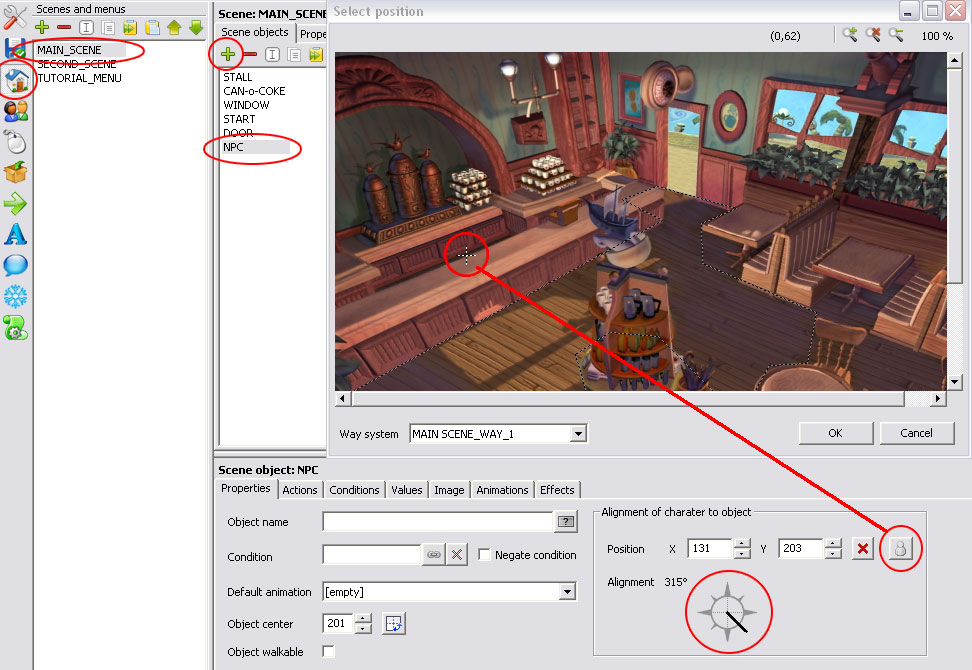
We must now
create the standing point for this character, so lets
go to the scene panel ![]() and
select the MAIN_SCENE, create a new object and name it NPC
and
select the MAIN_SCENE, create a new object and name it NPC
Then go
into the position placement ![]() and add
the position of the character. (since I made this
character to be behind the counter desk, I placed the cross where the legs
should be covered. Remember where I placed the animation center
of the character?)
and add
the position of the character. (since I made this
character to be behind the counter desk, I placed the cross where the legs
should be covered. Remember where I placed the animation center
of the character?)
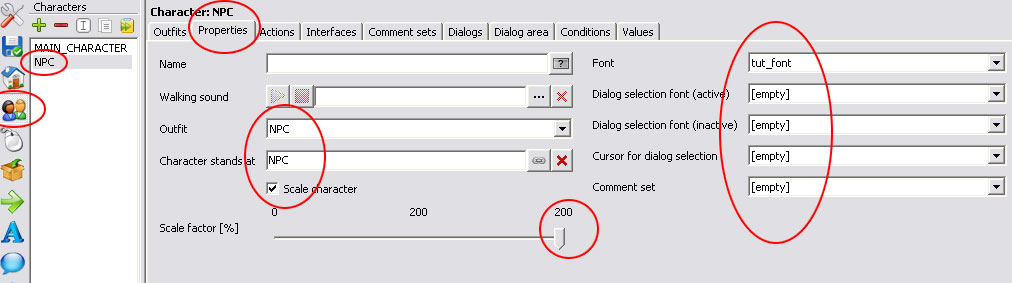
Now we
establish the properties of this Character.
We must
tell where this character is going to be placed, so in the Character Stands at
we select the NPC object from the main scene, since this character was created
much smaller then the main character I had to scale it up to 200% (this scale
only affects this character), the font can be established to a font created for
this character, but for this tutorial I will use the one font we created for
everything, but you can assign different fonts to different characters.
You dont
need to assign dialog fonts since this character wont be used by the player.
Now we are
ready to create interactions with the NPC.
Im going to
start with the basic dialogue and some interaction like LOOK.
Although we
created an NPC object we wont be creating the actions
on the scene object, but to the character itself, so go into the CHARACTERs panel, select the NPC and open the ACTIONS panel.
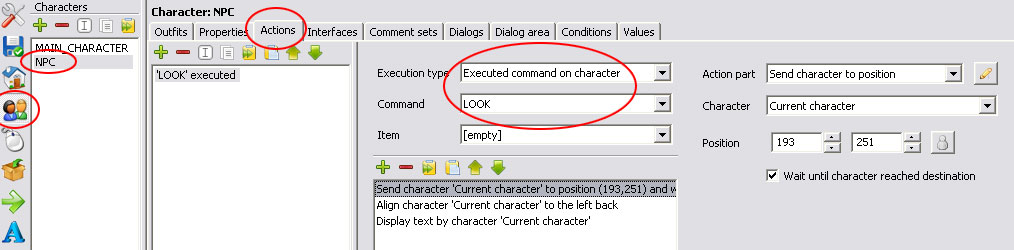
Lets create
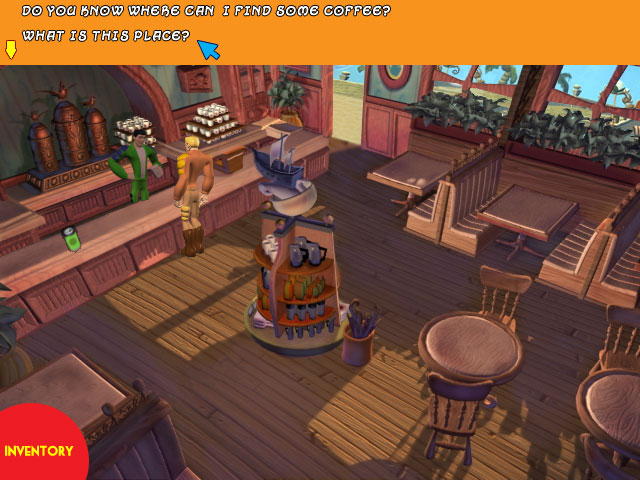
an action for the LOOK command and lets add a DISPLAY TEXT with any phrase like
This is the shops owner <p2>
If you do a
save/run you will notice you will have a problem with the LOOK command, and is
because the NPCs position is outside the WAY BORDER.
BUT we can
create a virtual position for the character to stand at when the command is
executed (this is ideal for speech since both
characters should face each other in a conversation)
SO add an
action part of SEND CHARACTER TO POSITION, a pop up window will be shown with
the scenes of your game, select the MAIN SCENE (since that is the scene the NPC
is located in) and select the position you want the character to stand in (Most
be inside the way border)
The second
command should be to ALIGN CHARACTER so it faces the NPC, choose the compass to
a left-back position.
Then the display text action part.
Now we are
going to create an action for the TALK
command, this works like a cut scene.
What I want
to do is have the character ask for coffee and have a full dialog the first
time, but when the character asks the NPC a second time it replies with a
single straight answer.
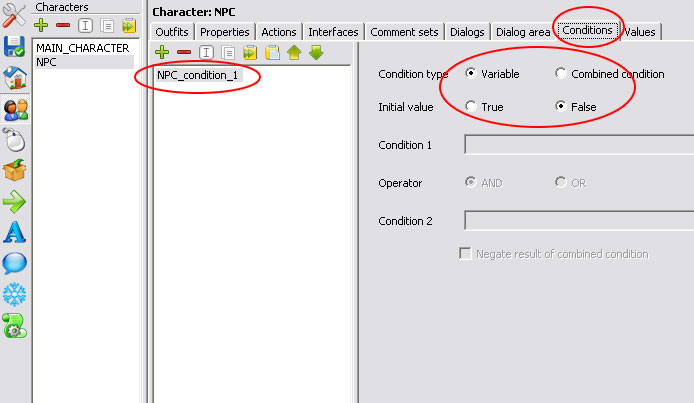
For this we
are going to create a CONDITION for
the character, lets leave it as FALSE
and name the condition NPC_condition_1
Now create
the action for the TALK command and lets create the interaction.
The first
thing we have to do is create the action part to send the character to the NPC SEND CHARACTER TO POSITION (we can copy ![]() this
action part from the one we created for the LOOK command and paste
this
action part from the one we created for the LOOK command and paste ![]() it in
the TAKE action parts.)
it in
the TAKE action parts.)
Now we add
an ALIGN CHARACTER action part so the character faces the NPC (we can copy ![]() this
action part from the one we created for the LOOK command and paste
this
action part from the one we created for the LOOK command and paste ![]() it in
the TAKE action parts.)
it in
the TAKE action parts.)
Now we create
an IF CONDITION for the NPC_CONDITION_1 as FALSE
Im going to
initiate the dialog with the CHARACTER asking for some coffee trough a DISPLAY TEXT action part
Then we are
going to create a response coming FROM
the NPC, for this we create another DISLPAY TEXT action part but we select
the NPC in the CHARACTER tab of the
display text action part.
We repeat
this as many times as we want to
When the
dialog ends we are going to change the NPC_CONDITION_1
to TRUE (this will change the initial condition so we wont see the initial dialog
again but we will see the second dialog instead (the one after the ELSE))
We split
the conditions with an ELSE action
part (This means IF
CONDITION for the NPC_CONDITION_1
as the opposite in this case is TRUE)
Now we
create a display text action part for the character asking for coffee for a
second time
And we
create a display text for the response of the NPC
We close
with an END IF action part.
You are not
limited to display texts here, you can ask or give items, open other locations
in a map, etc.
Creating
DIALOGS Q&A, these are the ones that appear as a list of Question/Answer.
Go into the
character you want to have the dialog with and open the DIALOGS panel, create a new dialog and name it, for this tutorial I
named it NPC_DIALOG_1, you will get a dialog tree on the right window with this
icon ![]() (you
should change the name for it too) Under this tree we will create our dialog
questions. So go ahead and create a new Dialog part
(you
should change the name for it too) Under this tree we will create our dialog
questions. So go ahead and create a new Dialog part ![]()
The dialog
parts consist of a question (from your character) and an answer (given by the
dialog holder, in this case the NPC) you can call actions and execute actions
of all kinds when if you stablish them for this
action part, a good example would be asking for a place and making that place
appear on a map after you asked for it.
If you dont
want a Dialog part to appear again you should check the DELETE DIALOG PART
check box.
Since there is only one level of dialog (1. 2. and 3.)
you should leave the STAY AT SAME DIALOG LEVEL for all
parts.
Also note
the pauses <p2> in the dialogs
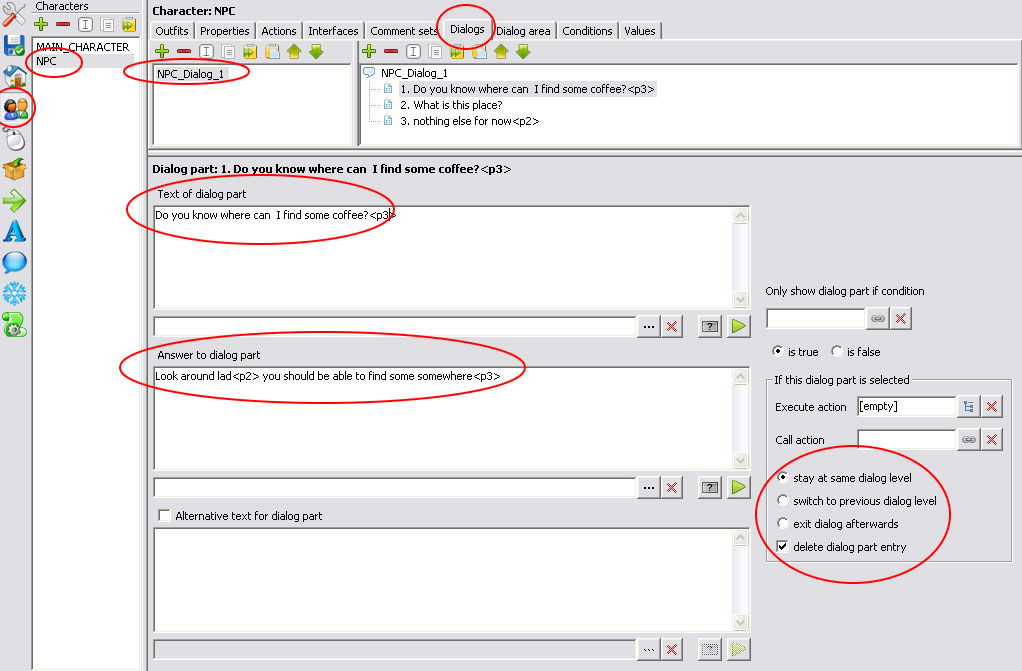
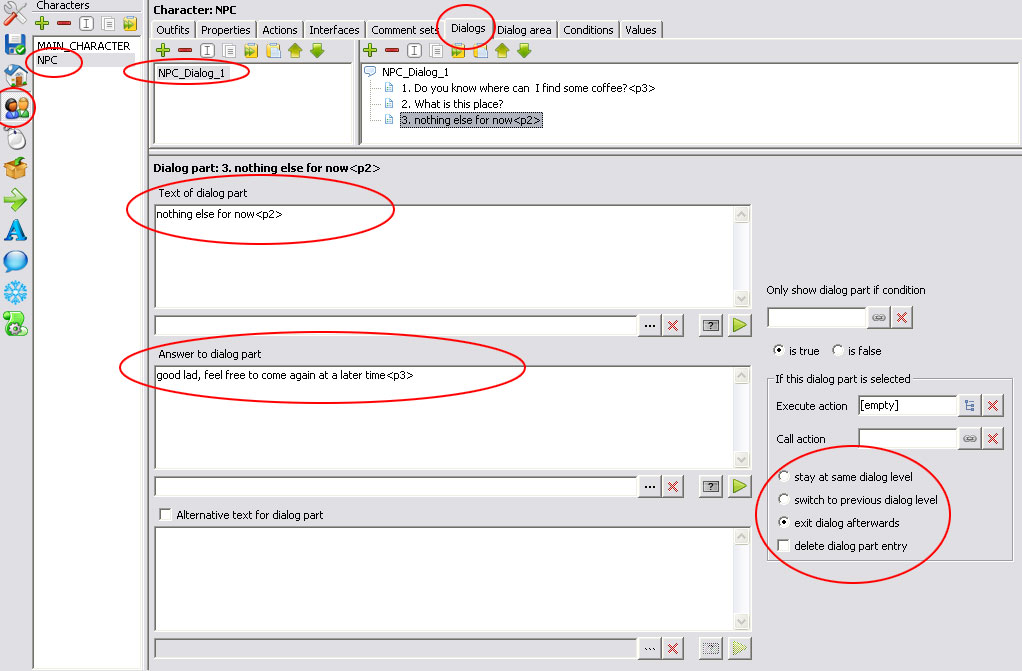
Now we need
to have an EXIT DIALOG part or we will get stuck.
For this
select EXIT DIALOG AFTERWARDS, and I
didnt mark the delete dialog part so we can get this dialog again with only the
questions we didnt delete.
You can add
more options in your dialog parts, so these can be activated when you select
the initial question.
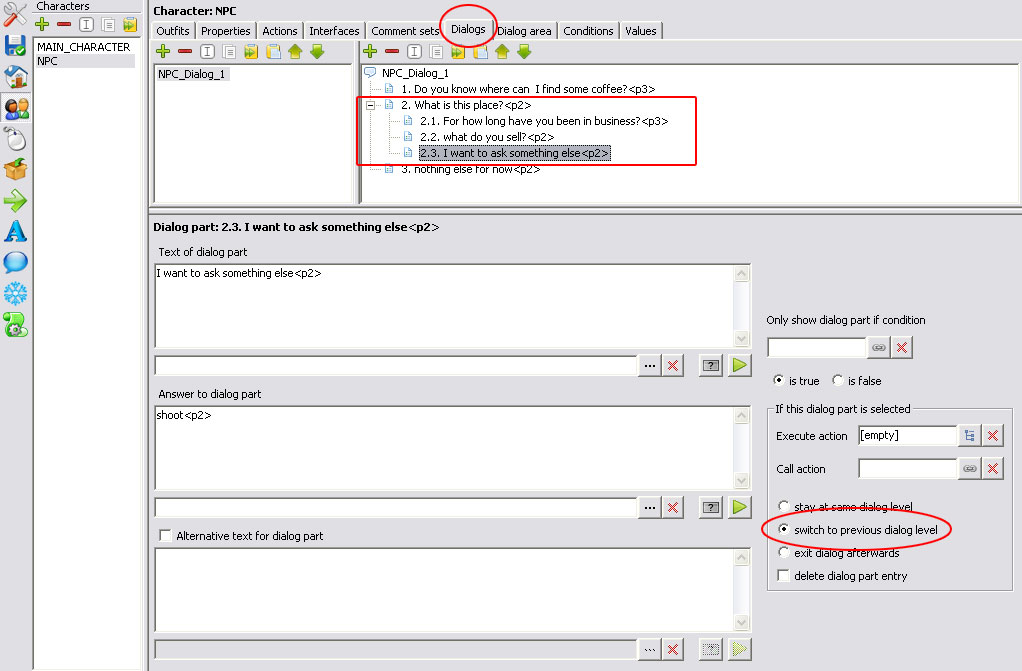
If you create
other layers of dialogs (like I did in the image bellow for question 2.) you
should create an extra dialog part that will switch to a previous level, this will close the question 2 sub
questions and shows the initial questions again. And since we checked the
delete dialog part you wont see question 2 appear again.
Now for the
fun of experimenting, I want the character to ask for a CAN-O-COKE after the
NPC is asked what he sells, since there is only one
can over the counter (the one we created in the ITEMS pert of the tutorial) we
are going to have two choices in an EXECUTE ACTION.
This action
will be performed in two ways trough an IF/ELSE condition, so if you already
took the CAN-O-COKE, then the npc will tell you you already have it, but if you havent taken it the npc will give it to you and it will disappear from the
counter so you wont be able to take another one
For this we
are going to use the CAN-O-COKEs condition
So start
with an IF condition CAN-O-COKE is TRUE. (This will happen if you havent taken
the CAN-O-COKE yet)
Add an ADD
ITME CAN-O-COKE
And add a
CHANGE CONDITION for the CAN-O-COKE_CONDITION
to FALSE (so
this will make the can to disappear from the table)
Split with
an ELSE
Add a DISPLAY TEXT for the character NPC telling you you already have the
last one
Finish with
an END IF
See the
actions in the image bellow.

You should
have some basic idea about how dialogues, conditions and actions work by now so
you can start creating more difficult interactions.
Do a save
and run at this point and see what you have done so far.
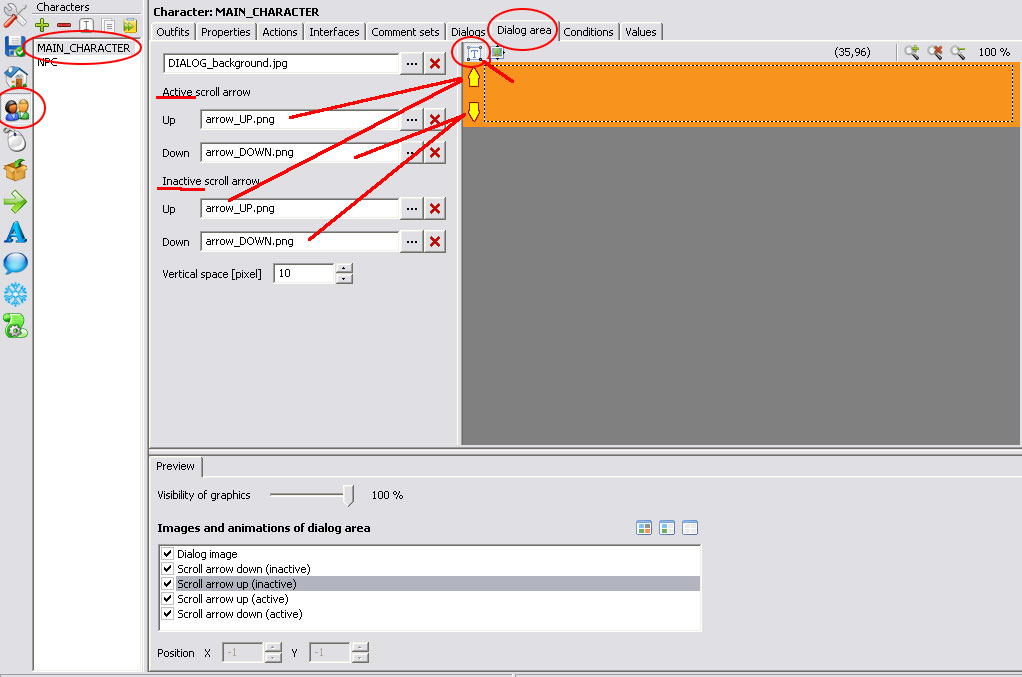
We can
create a Dialog Area so we can have our dialog questions encapsulated
somewhere, this Dialog area should be created for the MAIN_CHARACTER, something like this should do.
Add a
background image for the dialog area (for this tutorial
I made it a solid orange colour)
Create your
arrow icons and place them into position (you can
create an active and inactive arrow image for each arrow)
Now you should
specify the area where dialog options will be displayed in, so select the set
dialog area icon ![]() and
create the area your dialog will occupy.
and
create the area your dialog will occupy.
Dont worry If you have many options these will be accessed by scrolling
trough the arrows.
IMPORTANT:
create a font that is very small for the dialog selections, this way you can
display more dialog options in the dialog area.
You can
change the VERTICAL SPACE number if your dialog options show too far apart.
Do a
save/run and you should see your dialogs working