8.- Making an Inventory in the style of TELLTALEs Sam and Max
The
inventory can be made in a LOT of different ways, some make it similar to
Monkey Island 3 or Fullthrottle, others create inventories
similar to the old Lucas Arts adventure games similar to Maniac mansion 2 and
monkey island 1 and 2, but Im going to show you another one but similar to the new Sam And Max games from TellTale.
Lets start
by creating TWO new Interfaces in
the interface panel![]() , lets
name them INVENTORY_ON and INVENTORY_OFF
, lets
name them INVENTORY_ON and INVENTORY_OFF
Let’s start
with the INVENTORY_OFF, the first interface was named
OFF since it will only work as a button that will open the real inventory.
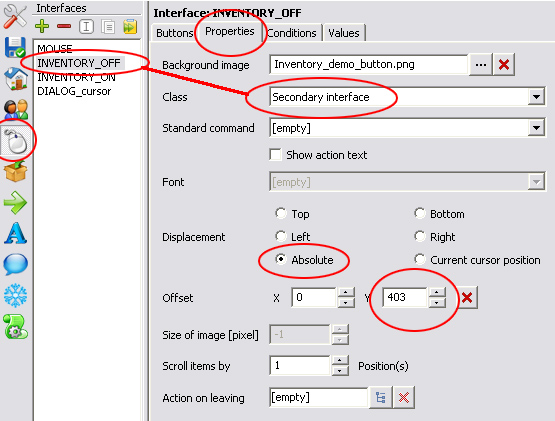
The first
thing we should do is load the Image of this inventory, to do so lets go to the
PROPERTIES panel an in the background Image select the image of your inventory.
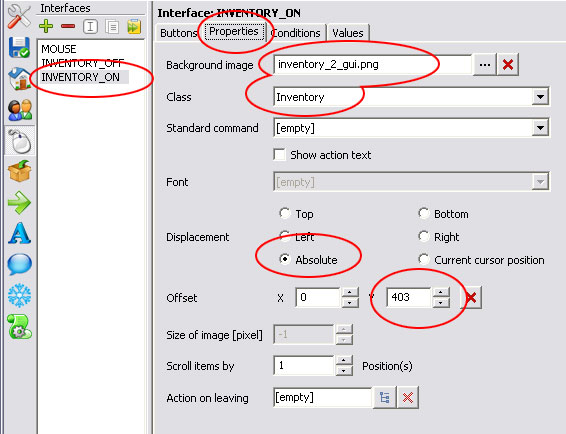
Since I want to place it at a specific position I selected the ABSOLUTE displacement and used an OFFSET in Y of 403 (Y is VERTICAL placement on the screen and X is HORIZONTAL
placement on the screen) (depending on the resolution of your game and the size
of your inventory’s image this number will defer greatly, just play with
numbers and do test runs to see the changes)
You can do this to establish your
interface’s position: take the game’s vertical size (this tutorial height is
600… remember the 800x600 resolution?) and subtract the height of your
interface’s size (in this case my inventory was 197 pixels height) so the
placement for MY inventory was at 403
(600 – 197 = 403) you don’t need to be a
math guru to figure this up ^^
Also
establish the CLASS as SECONDARY
INTERFACE, since this is only going to work as a Button we need to classify
it as a SECONDARY INTERFACE because we want to be able to show/hide the inventory
later on and we don’t want to mess with the mouse interface which is part of
the Main interface, If we establish
it as another inventory interface then it will hide too since the function
show/hide affects the interfaces depending of their class.
Now open
the BUTTONS panel and you should see
your Inventory image, now create a new button, I called it INVENTORY_ON_BUTTON, and created a polygonal area ![]() in the
shape of the image
in the
shape of the image
Also
establish the Button type as an ACTION AREA
(action areas work as clickable buttons)
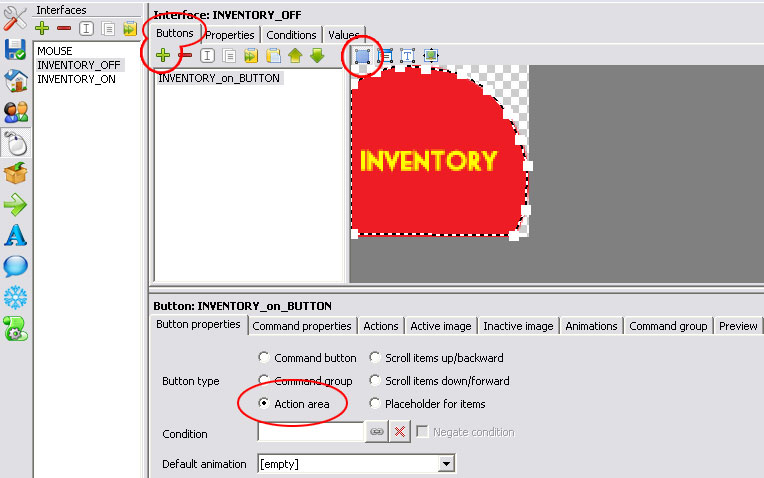
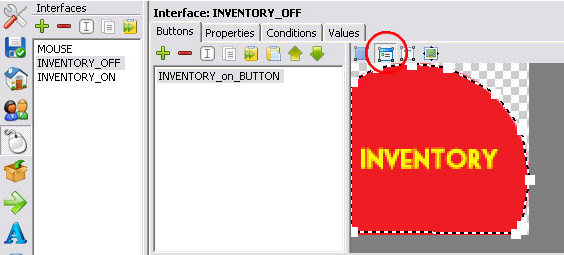
IMPORTANT, you ALSO need to create an interface area ![]() similar to the polygonal area. The Interface
area specifies the area of the interface, if the image covers too much
transparent space you won’t be able to make your character walk under that area
unless you specify the interface area (Note how I
selected only the red button area and left the transparent area out of the
interface).
similar to the polygonal area. The Interface
area specifies the area of the interface, if the image covers too much
transparent space you won’t be able to make your character walk under that area
unless you specify the interface area (Note how I
selected only the red button area and left the transparent area out of the
interface).
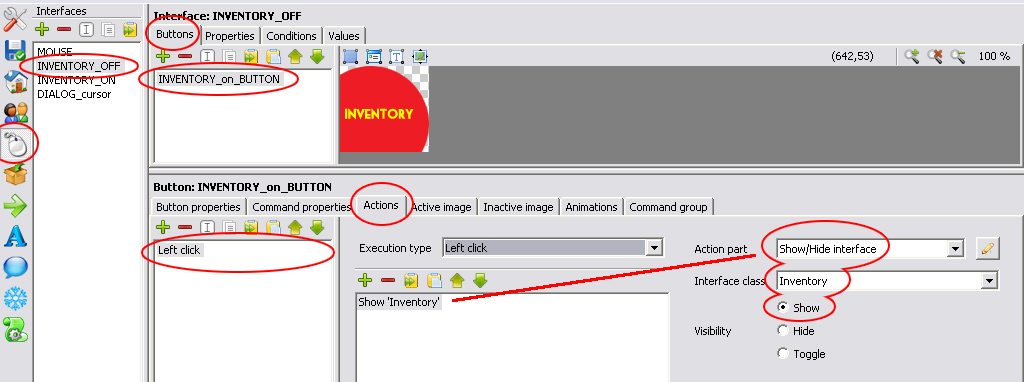
Now we are
going to create an action for the INVENTORY_ON_BUTTON
button, Open the ACTIONS panel and add a new action, set the Execution type to
LEFT CLICK (you can also create the execution type of “Cursor Enters button area” if
you want a pop up effect),
for the action part lets create a SHOW/HIDE
INTERFACE for the INVENTORY
class and select SHOW.
What we did
is create a button that will show the inventory when pressed.
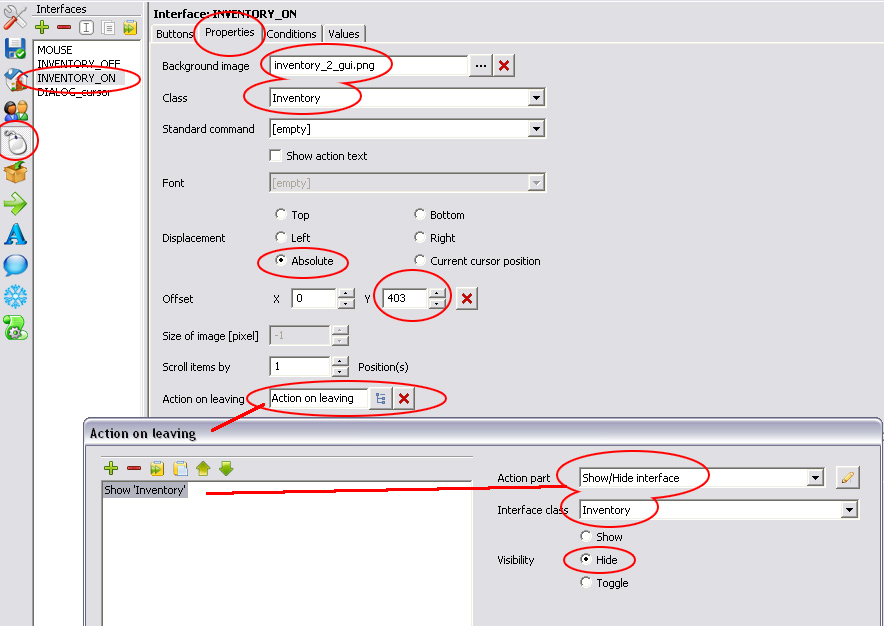
Now lets configure the INVENTORY_ON
interface
Go to the PROPERTIES and load the image for the
Inventory in an OPEN state, select under CLASS to be an INVENTORY, If this inventory is of the same height than the
INVENTORY_OFF then select the ABSOLUTE displacement and use the same number for
the Y offset (for this tutorial it is 403)
For the inventory
I want to be able to close it when I leave the interface area, for this we are
going to add an action to the “ACTION ON LEAVING” in the properties of the
inventory.
Select the
button ![]() and a new window will open, here you will
create an action with the SHOW/HIDE
INTERFACE action part for the INVENTORY
set to HIDE.
and a new window will open, here you will
create an action with the SHOW/HIDE
INTERFACE action part for the INVENTORY
set to HIDE.
What we did
is tell the interface to hide when we go out of the inventory area.
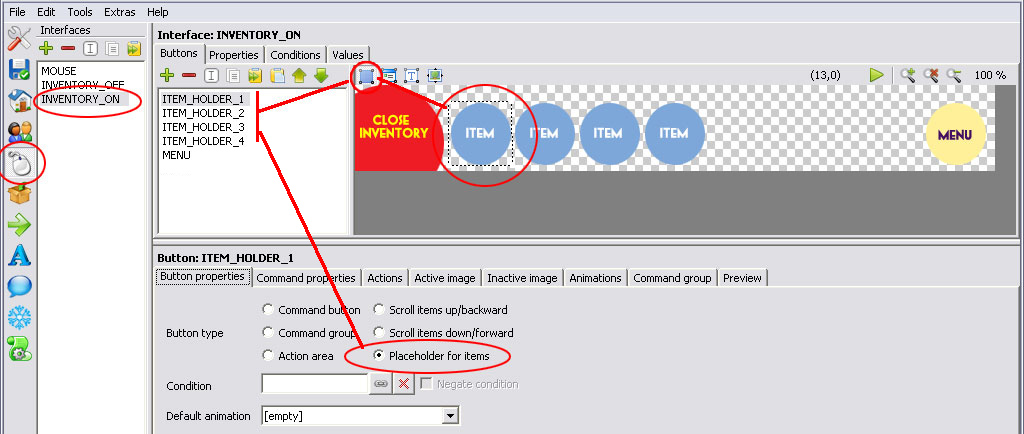
Now go into
the BUTTONS panel and here we are going to create several buttons, I created 4 ITEM HOLDERS, these are the spaces
where the items you collect in the game are going to be displayed in, each item
holder can hold only ONE item, so you should create a few holders if you can
store several items.
(if you need more
items in your inventory than the amount of spaces available, you can create
arrow buttons with the BUTTON TYPE established as SCROLL ITEMS UP or DOWN and
these will cycle trough the entire inventory)
For the ITEM HOLDERS establish the Button type
to PLACEHOLDER for ITEMS and create
the corresponding polygon area for each.
I created
an extra button called MENU, and it works similar to the F1 key, it loads the
MENU screen. (you should know
how to establish this already by now.)
IMPORTANT: the INTERFACE AREA ![]() should cover ALL the buttons in this interface
or you wont be able to use the items.
should cover ALL the buttons in this interface
or you wont be able to use the items.
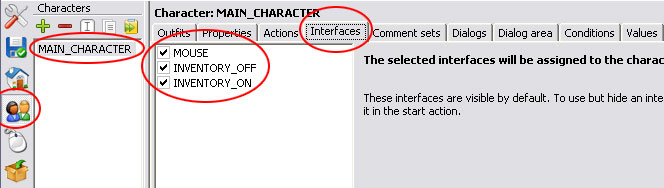
Before we
go on testing our interfaces we need to apply them to our character, go to the
characters tab, select the players character and under the INTERFACES tab check
the INVENTORY_OFF interface, dont
activate the INVENTORY_ON because
that is going to be done trough the Inventory_off button.
Before we
go testing it we should change the inventory’s visibility, for this we will
open the GAME panel ![]() an in the “AT BEGINNING START FOLLOWING
ACTION” lets create an action
an in the “AT BEGINNING START FOLLOWING
ACTION” lets create an action ![]() to SHOW/HIDE INTERFACE for the INVENTORY set
to HIDE
to SHOW/HIDE INTERFACE for the INVENTORY set
to HIDE
If we don’t
add this we will have the inventory shown open at the beginning while the idea
is to have it closed at default and being opened by the user at will.

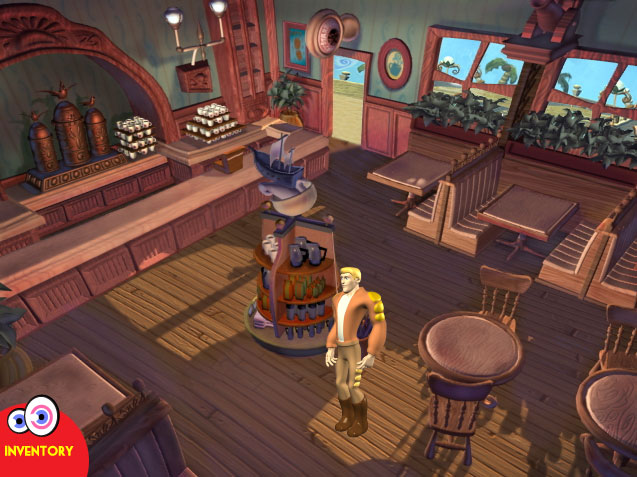
Do a test
run and you should see something like this, the button that opens the inventory.
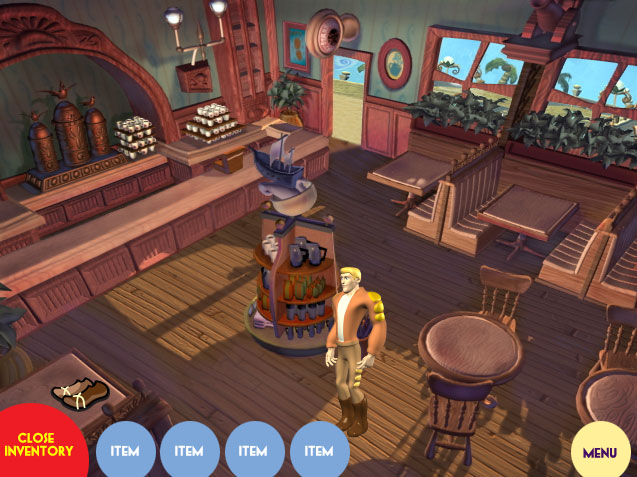
And after
the inventory is opened.
You are now
ready to create Items