7.- CREATING ITEMS
Now that we
have a fully working Inventory its time to add some items to the game.
Go to the
ITEMS panel ![]() and
create
and
create ![]() your
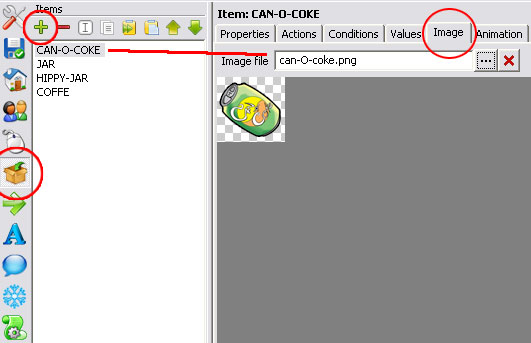
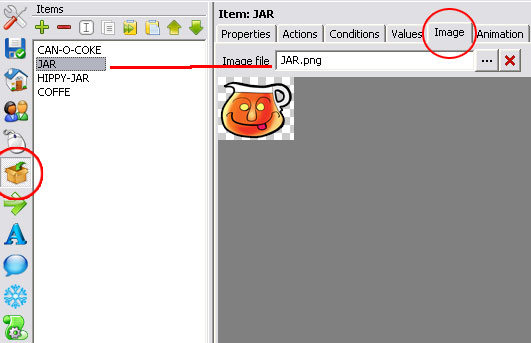
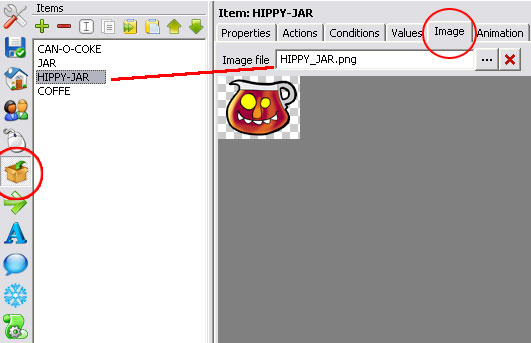
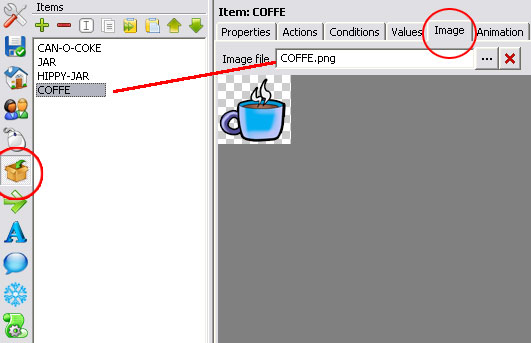
items, for this tutorial I created 4 items and named them CAN-O-COKE, JAR,
HIPPY-JAR and COFFE and assigned an image to each by going into the IMAGE tab and selecting the proper
image (I suggest you use PNG files)
your
items, for this tutorial I created 4 items and named them CAN-O-COKE, JAR,
HIPPY-JAR and COFFE and assigned an image to each by going into the IMAGE tab and selecting the proper
image (I suggest you use PNG files)
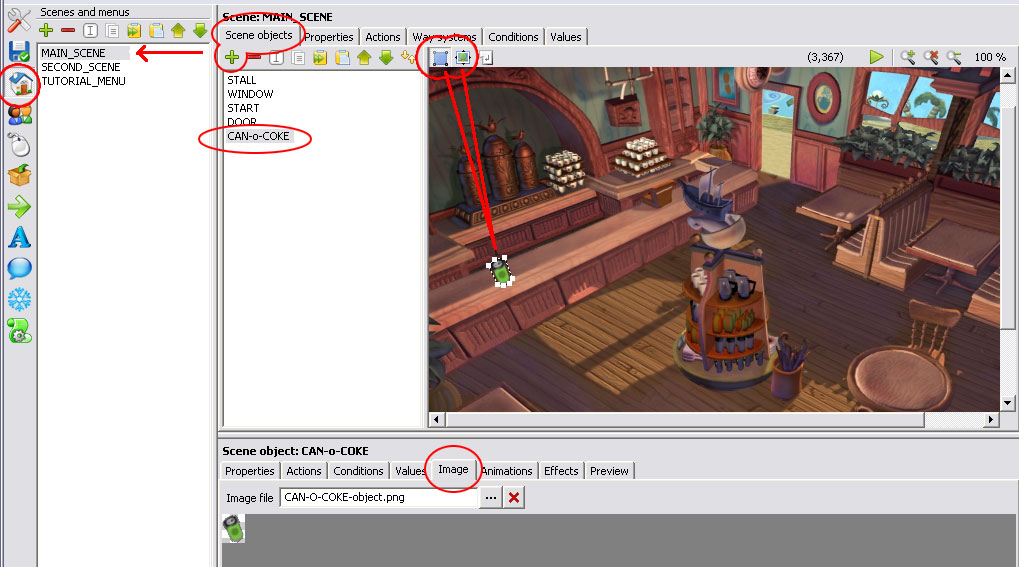
Now we go
to the first Scene and create a new object and lets call it CAN-o-COKE, then
place it in the scene, move it into position and create a polygonal area that
cover the entire can (you should know how to do this
already).
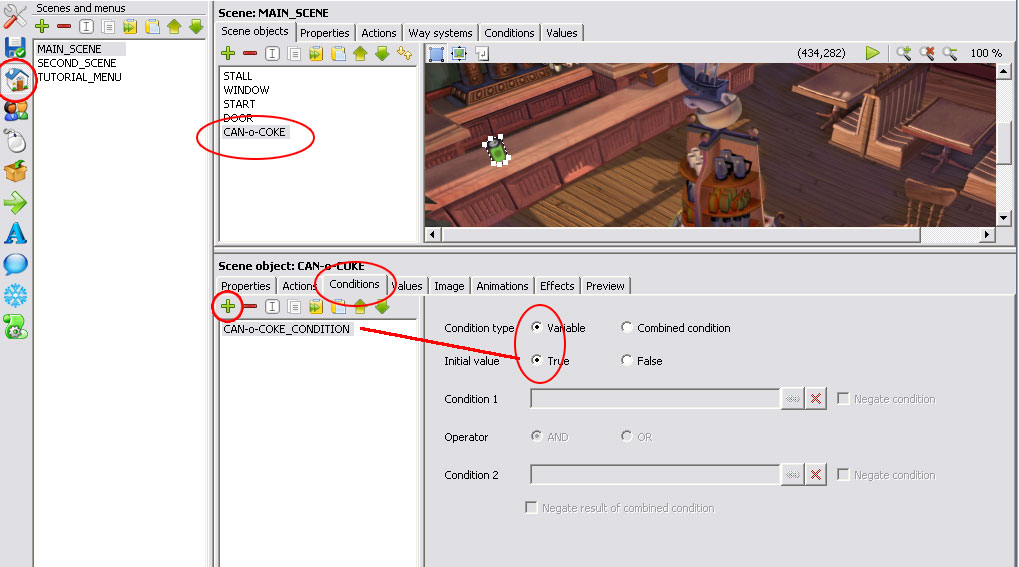
Since this
is going to be a pick able item we are going to add a CONDITION to it, so open the CODITIONS
panel and create a condition and name it CAN-o-_CONDITION
(or something related to the object) and set its initial value to TRUE.
Settig the condition to TRUE will mean that the objects
initial state is visible and later when its picked the condition will be set to
FALSE and it will make it disappear.
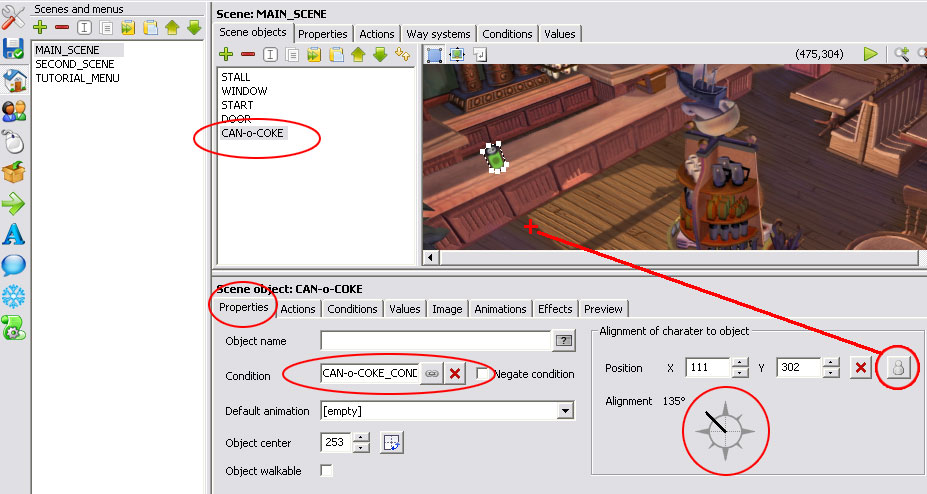
Now open the
PROPERTIES panel and establish the Objects position ![]() in a
suitable place for the character to reach the object and pick it while still
being inside the WAY BORDER.
in a
suitable place for the character to reach the object and pick it while still
being inside the WAY BORDER.
Also assign
the alignment the character will use when it reaches the object.
Finally we
are going to establish the items condition into the CONDITION tab, by assigning the condition in the items properties we
are telling the object to follow the visibility according to the (TRUE/FALSE)
statement
(True = visible and selectable / False = Invisible and un-selectable)
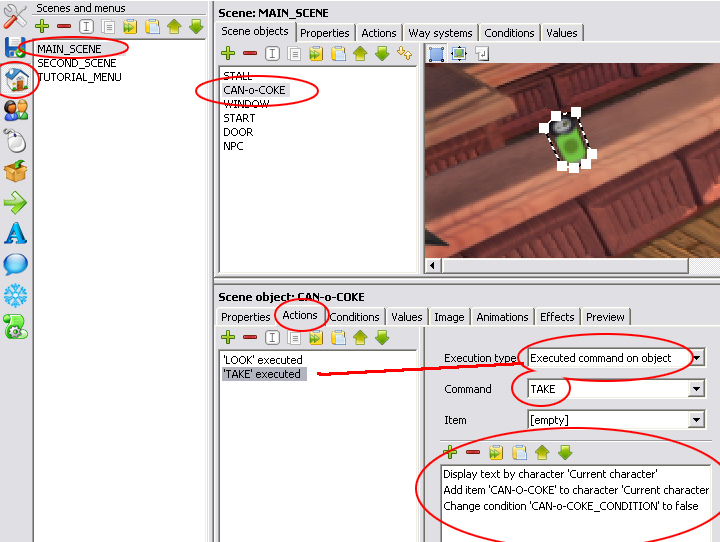
Finally we
are going to set the ACTIONS for this object. You can add some actions for the
LOOK, TALK, etc, but for this tutorial Im going to focus on the TAKE action.
SO, lets
add an action with execution type set to EXECUTED
COMMAND ON OBJECT, for the command TAKE,
and we are going to add these actions:
I started
with a DISPLAY TEXT, with this the character will say
something before it takes the item.
Then we
create the action ADD ITEM CAN-o-COKE (this
will create the item into the inventory)
And we add
the Action CHANGE CONDITION of CAN-O-COKE to FALSE (this action will make the can
disappear from the scene giving the illusion that the character took the item. )
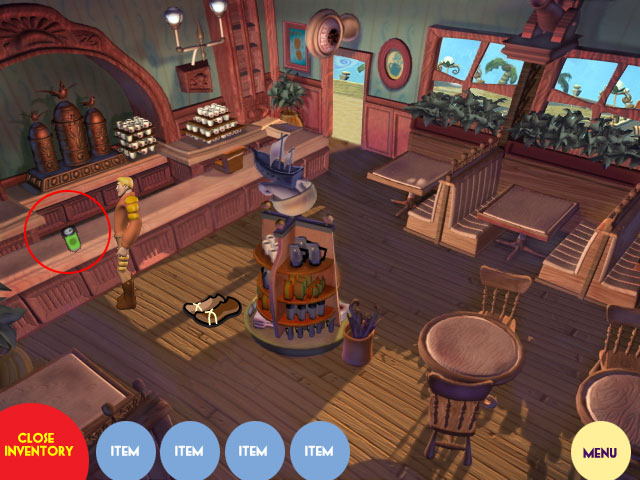
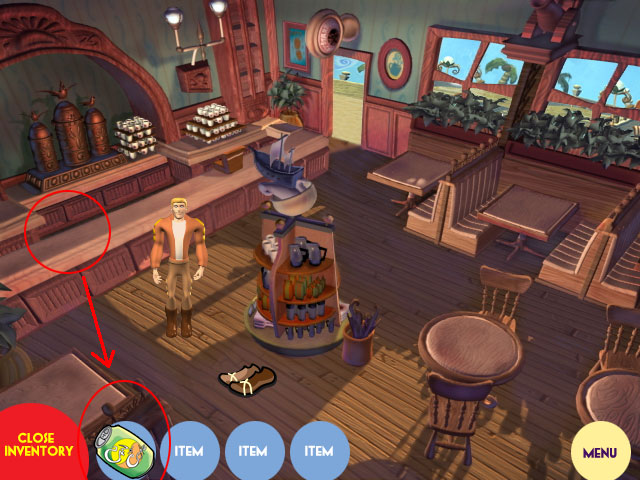
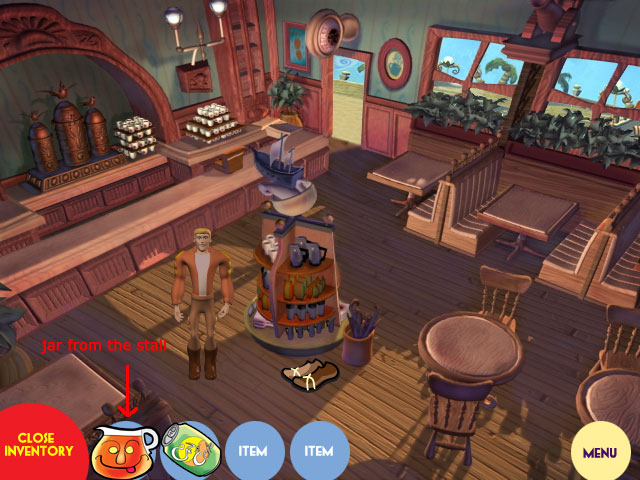
Save/Run
and test your object, in the following screens you can see the before and after
actions.
That’s it, now fell
free to create as many objects as you would like in your games.
Picking objects from
other places
We already
know how to pick objects that are present in the scene, but what about objects you
dont see in the scene?, something you can get by looking in a coffin, box or
wardrobe?.
And on top
of that what if we CANT pick the object until we do something else first, like
looking at it or finding it.
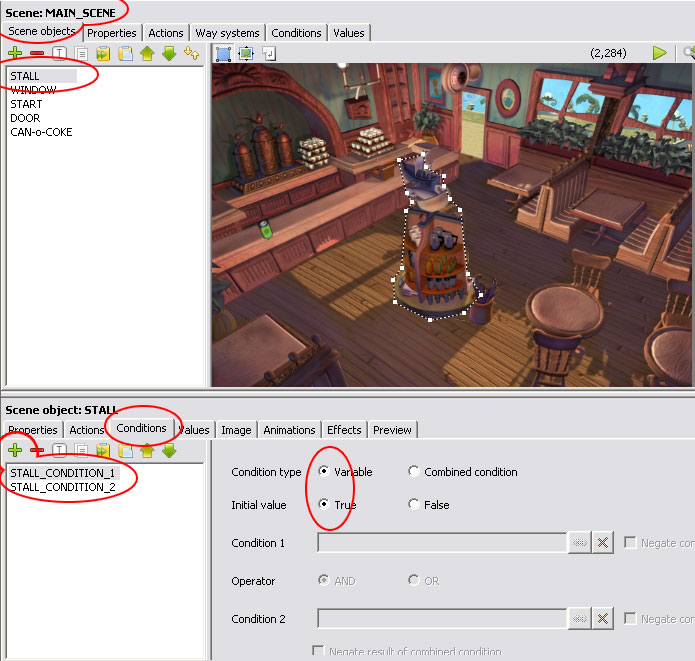
For this
one Im going to use the Stall we already created, and the first thing we are
going to do is create TWO conditions
in it and name them STALL_CONDITION_1
and STALL_CONDITION _2, lets change
their value of both as TRUE.
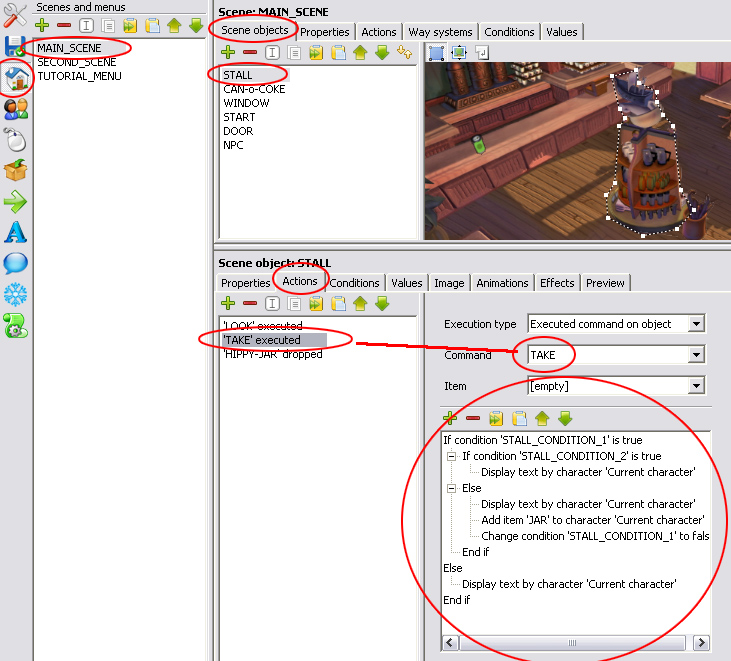
Now the tricky part
We want the
TAKE action to tell us we need to LOOK before we can pick anything up, so:
Lets start
by adding an IF CONDITION is TRUE
for the Stall_condition_1 (since the condition
is TRUE the actions under its tree are going to be loaded first)
Now we add
another action of IF CONDITION is TRUE
for the Stall_condition_2 (since the condition
is TRUE the actions under its tree are going to be loaded first)
Now we will
create an action part of DISPLAY TEXT
and we are going to write something like I
should look the stall first (since its under the TRUE condition you wont be able to do anything
else unless that condition is set as FALSE)
Now we
added an action part of ELSE to
split the condition statements (This means IF condition is TRUE do something, ELSE (if
condition is FALSE) then do another thing)
For the
second option We can create a DISPLAY TEXT saying something like I will take that Jar
Now add an ADD ITEM and select the JAR
And we
change the Condition of Stall_condition_1
and Stall_condition_2 to FALSE (with
this we are overriding the initial conditions and are affecting the IF
conditions)
Now we
finish this with an END IF action
part.(this will close the
initial question remember we are still under the tree for IF CONDITION of Stall_condition_1 )
Now lets
split with an ELSE action part
And add a display text action part saying There is nothing else in here (so, if you already picked up the object from the stall your
character will tell you there is nothing else he can pick from this object)
And we
close with another END IF action
part.
See the image
bellow and you get an idea what I just explained above
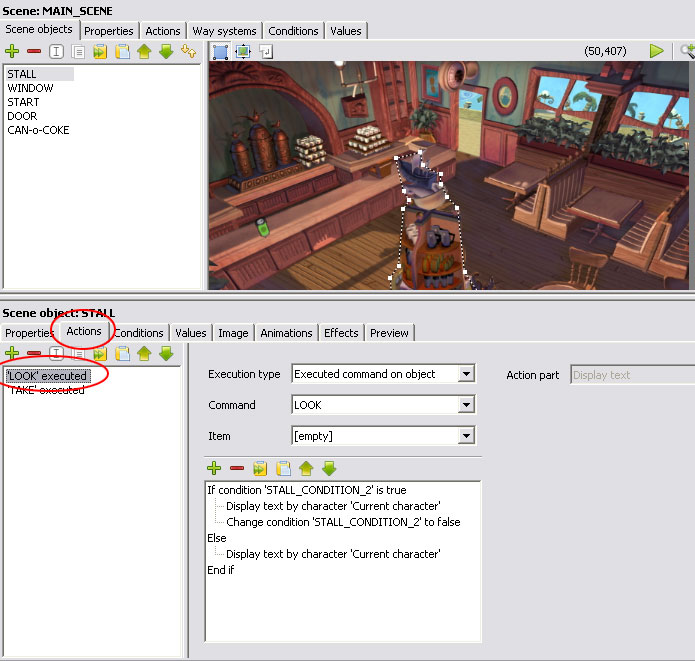
NOW we need to set
the actions for the LOOK at action:
We start by
creating an IF CONDITION is TRUE for
the Stall_condition_2
In it we
will add a Display text telling us There
is an item in here<p2>it seems to be a Jar<p2> (the <p2> are pause definitions of 2 seconds)
And we
change the Condition of Stall_condition_2
to FALSE (this
will allow the take action to take effect, if we dont add this we wont be able
to take the item)
Now lets
split with an ELSE action part
And add a display text telling There is nothing else in here
Finish with
an END IF
You should
have something like this:
How does this work?
Well, if you
use an IF action you can do a couple of things with it since you can add an
ELSE action, a more graphical example could be somebody telling you
IF you go with me we might have a good time, ELSE (like saying the contrary) you might not live to see the day.
So IF you go with that person you wont
die, but we can make it interesting by adding another choice like else you die,
if you died then IF you where good
you go to heaven ELSE you go to
hell, If you didnt die then you dont know if you go to heaven or hell.
Hope the
example was understandable enough of the structure.
The conditions are a way to control the yes or nos of the Ifs, and we created
TWO since we where asking Two different questions.
The END IFs are necessary so you can close each question, if you
dont put those END Ifs then the code will read to the next question instead of
stopping where needed.
A
programmer might give proper answers about codes and structures, but IF it
works for me then is al good ELSE Im teaching you wrong (hehe!!)
Now go save
and run, you should be able to have some interactions
until you are finally able to pick your JAR item from the stall.
USE ITEMS ON OBJECTS
Nice, we
now know how to add items that can be stored in our inventory, but an adventure
game relies not only on picking objects, but on using them as well.
SO, for
this tutorial Im going to show you how you can use an item over an object and
receiving an item, and also how you can combine two objects to create another
item.
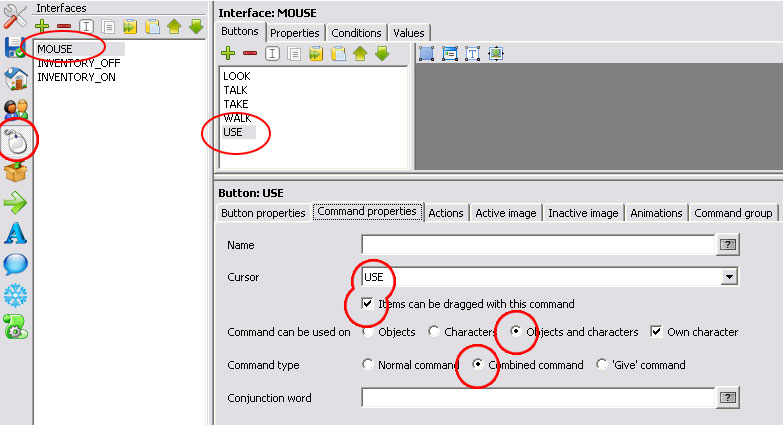
First (if
you havent done so) you can create the USE
cursor (you should know how to do this by now)
We need to
specify some setting for this cursor if we want to be able to use (drop) items
over other items or characters.
The Button
type Must be establish as COMBINE
COMMAND, and command can be used on should be established as OBJECTS AND CHARACTERS and the most
important feature ITEMS CAN BE DRAGGED with this command check box, the cursor should be
established to the USE cursor you
created in the cursors section.
Now, if we need
to combine a couple of objects to get a third, we need to create a very simple
action.
Lets open
the ITEMS ![]() panel and
select one of the two items you need to combine, then add an action, in the
execution type select ITEM DROPPED
<-> (Its quite important that you select the
one with BOTH ARROWS (<->)
since this means you can drag either object over the other, so it works both
ways, if you only use ITEM DROPPED then you have to set this action on the
other object as well, so its easier to use the both ways option, but you are not limited)
panel and
select one of the two items you need to combine, then add an action, in the
execution type select ITEM DROPPED
<-> (Its quite important that you select the
one with BOTH ARROWS (<->)
since this means you can drag either object over the other, so it works both
ways, if you only use ITEM DROPPED then you have to set this action on the
other object as well, so its easier to use the both ways option, but you are not limited)
For this
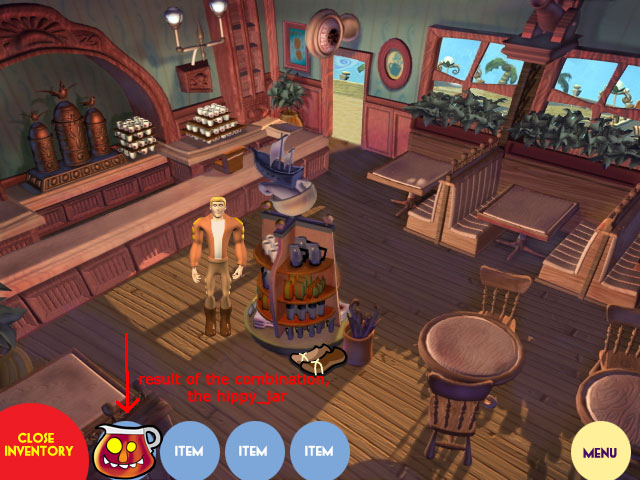
tutorial I want to combine the CAN-O-COKE
with the JAR to receive the HIPPY-JAR, for this we select either
the CAN-O-COKE or the JAR and add an ACTION of ITEM DROPPED
<-> since we can allow the combination to be done if any of the two
items are dropped over the other.
Now the
ITEM is the item you are going to drop onto, so, in this tutorial Im creating
the actions on the CAN-O-COKE so the ITEM should be the JAR (if we create the actions on the JAR the item should be the
CAN-O-COKE)
The action
parts for the object should be
We add a REMOVE ITEM JAR and REMOVE ITEM CAN-O-COKE (when we combine
items they should disappear to create another)
And we add
the ADD ITEM HIPPY-JAR (This is the item as result from the combination)

Do a test
run and you should be able to combine your items.
Now, if the
object you want the interaction to be is in you scene, you MUST create the
interaction in your SCENE’S object NOT in the item itself.
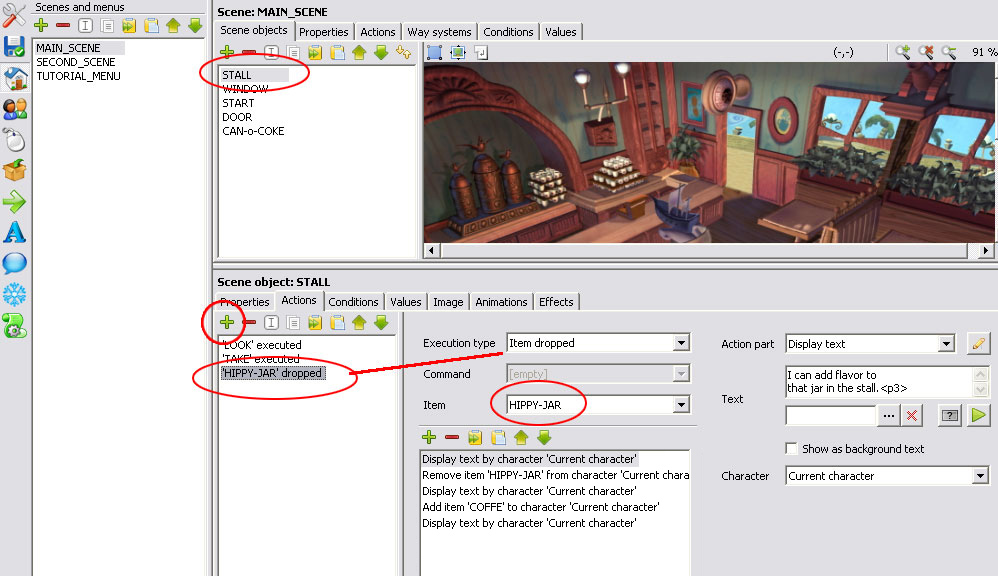
For this
tutorial I’m going to use the stall, so in the SCENES tab ![]() and
select the STALL object, add a new
action with the EXECUTION TYPE to ITEM DROPPED, I selected the HIPPY-JAR because you need to obtain it
from a combination.
and
select the STALL object, add a new
action with the EXECUTION TYPE to ITEM DROPPED, I selected the HIPPY-JAR because you need to obtain it
from a combination.
You can
create some interactivity for this action; the first action part is a simple
dialogue text of the action the character is going to perform
Then I
added an action part REMOVE ITEM and
selected the HIPPY-JAR
Then added
a DISPLAY TEXT so the character can
say something like it dissolved into
coffee
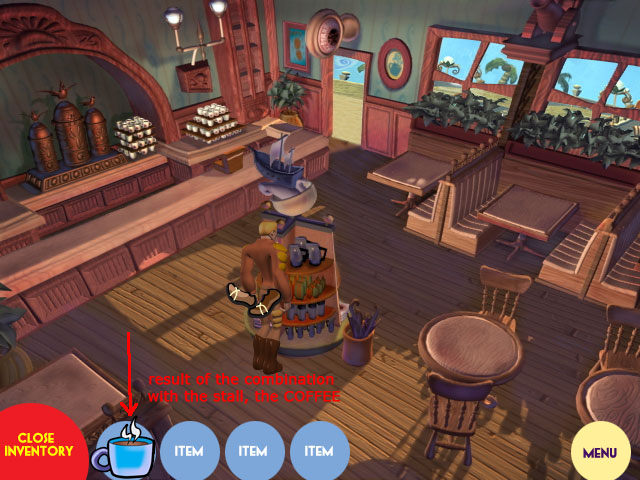
And we add
the ADD ITEM COFFEE (This is the item we get from the stall)
Then added
a DISPLAY TEXT so the character can
say something like mmm, this coffee smells great.
This is the
screenshot of the coffee item we get as result of both combinations.
And that’s
it
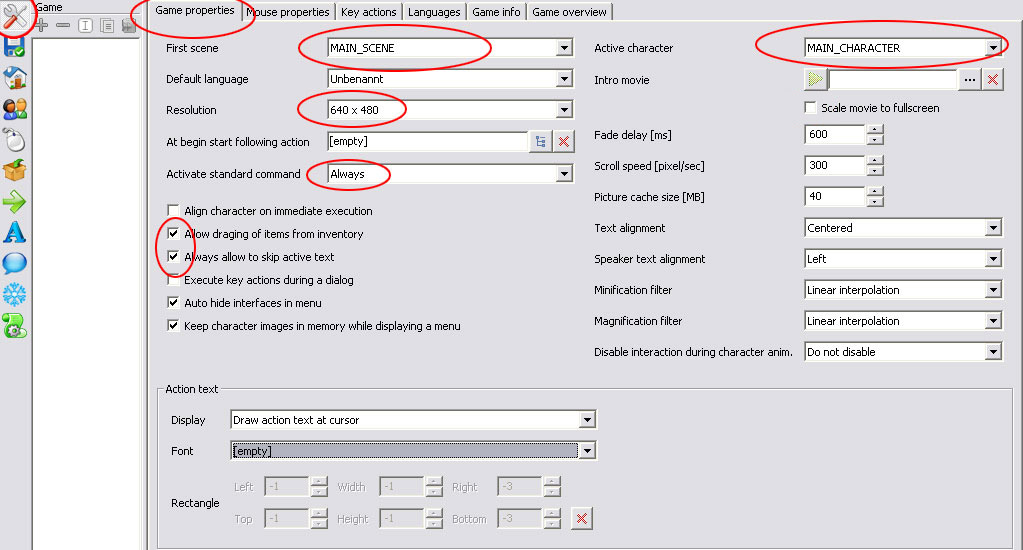
BUT BEFORE YOU GO TESTING, check the ALLOW DRAGGING OBJECTS FROM
INVENTORY check box on the game settings or you wont be able to drag anything.